> ## Documentation Index
> Fetch the complete documentation index at: https://docs.siftly.ai/llms.txt
> Use this file to discover all available pages before exploring further.
# Cloudflare
> Connect Cloudflare AI Crawl Control to see which AI and search crawlers read your store, which pages they hit, and how often.
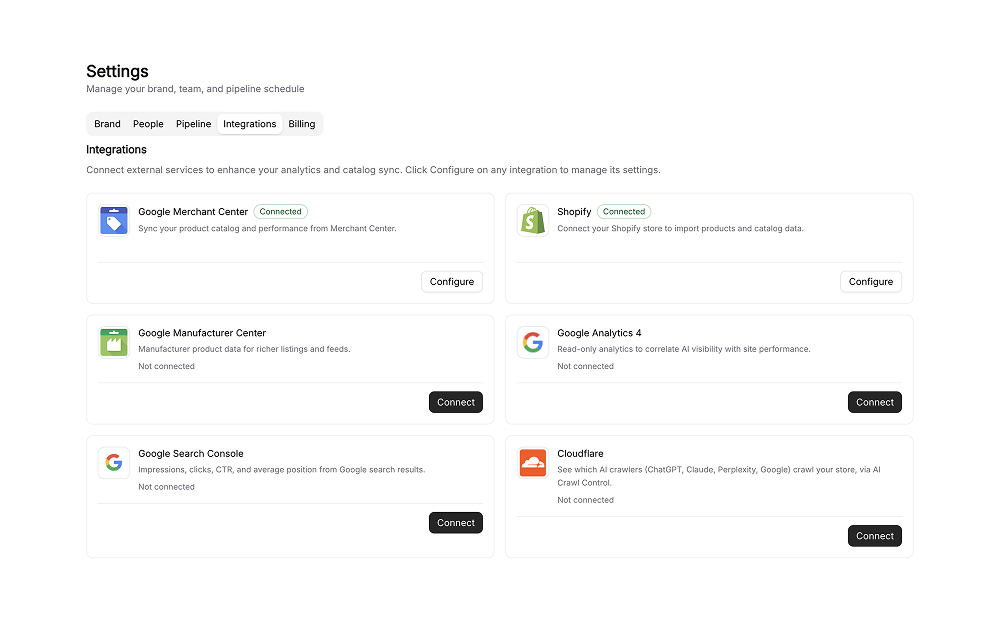 ## Overview
Connecting **Cloudflare AI Crawl Control** shows you which AI and search crawlers are visiting your store, which pages they hit, and how often. That covers ChatGPT (`GPTBot`, `ChatGPT-User`), Claude (`ClaudeBot`), Perplexity (`PerplexityBot`), Google (`Googlebot`, `Google-Extended`), and more.
This is the raw signal behind your visibility in AI answers: it tells you whether AI assistants and AI-powered search are actually reading your product and content pages. Once connected, the data appears on your [Traffic](/shopping/analytics/traffic) dashboard.
**Difficulty:** ⚠️ Medium. You route your domain through Cloudflare (a DNS change), then paste a read-only token into Siftly. Cloudflare's Free plan is all you need, at no cost.
This integration is **read-only**. Siftly never changes your site, DNS, or crawler settings. It only reads aggregated crawler numbers, through a token you scope to a single domain's analytics.
Cloudflare groups crawler activity into three types:
| Activity type | What it is | Example bots |
| ------------------------------- | ----------------------------------------------------------- | ---------------------------------------------- |
| **AI Citations** (AI Assistant) | Crawlers that fetch a page to answer a user's question live | `ChatGPT-User`, `Claude-User`, `PerplexityBot` |
| **AI Indexing** (AI Search) | Crawlers building an AI search index | `OAI-SearchBot`, `Claude-SearchBot` |
| **AI Training** | Crawlers collecting data to train models | `GPTBot`, `ClaudeBot`, `CCBot` |
***
## How it works
Cloudflare sits in front of your website as a reverse proxy. Every request to your store, including requests from AI crawlers, passes through Cloudflare's edge, where it is recorded in Cloudflare's analytics. Siftly reads those crawler analytics through a read-only Cloudflare API token that you generate.
Because of this design, your domain has to be served through Cloudflare for there to be anything to read. If you don't have Cloudflare yet, most of this guide is about getting your domain onto Cloudflare first.
The setup has four stages:
1. Create a free Cloudflare account.
2. Get your domain served through Cloudflare. This is the important step, and the method depends on your platform.
3. Create a read-only Analytics token and copy your Zone ID.
4. Paste them into Siftly under **Settings → Integrations → Cloudflare**.
***
## Prerequisites
* Your ecommerce domain (for example `store.example.com` or `example.com`).
* Access to wherever your domain's DNS is managed today, usually your domain registrar (GoDaddy, Namecheap, and similar) or your store platform's domain settings.
* Admin access to your Siftly organization.
* About 30–45 minutes. DNS changes can take a little while to propagate.
***
## Which path is yours?
Getting your domain onto Cloudflare works differently depending on how your store is hosted. Find your situation, then follow the matching path in Stage 2.
| Your setup | Can you change your domain's nameservers? | Path to follow |
| -------------------------------------------------------------------------------- | ----------------------------------------- | ------------------------------------------------------------------------------------------------------- |
| Custom domain on WooCommerce, BigCommerce, a headless store, or your own hosting | Yes, you control DNS at your registrar | **Path A** (standard onboarding) |
| Shopify store on a custom domain (standard Liquid theme) | Partly; Shopify manages some records | **Path B** (Orange-to-Orange) |
| Not sure | | Start with Path A. If your platform won't let you change nameservers, use Path B or ask Siftly support. |
***
## Stage 1: Create a free Cloudflare account
Go to `dash.cloudflare.com/sign-up` and create an account with your work email, then verify the email.
The Free plan covers this integration in full. A paid plan only adds verified-bot naming and, at the Enterprise tier, per-request logs. Both are optional niceties (see [What to expect](#what-to-expect)).
***
## Stage 2: Get your domain served through Cloudflare
### Path A: Standard onboarding (you control your DNS)
Use this if your domain is registered at a normal registrar and you can change its nameservers. This is the common case for WooCommerce, BigCommerce, headless, and self-hosted stores.
In the Cloudflare dashboard, click **Add a site** and enter your domain (for example `example.com`). Choose the **Free** plan when prompted.
Cloudflare scans your existing DNS records and shows them. Confirm that the record pointing at your store (usually an **A** or **CNAME** record for your root and `www`) is set to **Proxied**, shown as an orange cloud rather than grey. The orange cloud routes traffic through Cloudflare; a grey cloud means Cloudflare sees nothing.
Cloudflare gives you two nameservers (for example `xxx.ns.cloudflare.com`). Log in to your registrar and replace your current nameservers with these two.
Wait for Cloudflare to confirm the domain is **Active**, usually minutes to a few hours. You'll get an email. Once the domain shows Active with an orange (proxied) record, crawler traffic starts flowing through Cloudflare and being recorded. Continue to Stage 3.
### Path B: Orange-to-Orange for Shopify (Liquid) stores
Shopify serves your storefront from its own edge, so you can't simply move nameservers the way Path A does. Instead, you place your own Cloudflare zone in front of Shopify with a proxied CNAME. Cloudflare calls this **Orange-to-Orange (O2O)**. Your Cloudflare zone records the crawler traffic before it reaches Shopify.
Add the domain and point its nameservers at Cloudflare, exactly as in Path A.
In Cloudflare **DNS**, create a **proxied** (orange-cloud) **CNAME** for your storefront hostname pointing to `shops.myshopify.com`.
In **SSL/TLS → Overview**, set the encryption mode to **Full**.
Keep your existing domain configured in your Shopify admin so Shopify continues to serve the store and issue its certificate.
**Read these Shopify O2O landmines before you flip DNS:**
* **Do not turn on "Always Use HTTPS" in Cloudflare.** It breaks Shopify's automatic SSL certificate renewal (the Let's Encrypt `/.well-known/acme-challenge/` check), which can take your store's HTTPS down.
* **Checkout is not covered.** Cloudflare does not run on Shopify's `/checkout` path, so crawler activity there won't appear. This is expected and does not affect your product or content pages.
* **Use SSL/TLS = Full**, not "Flexible," so the connection to Shopify stays encrypted.
* **If crawler data is empty after setup**, the most common cause is a CNAME that isn't proxied (grey cloud instead of orange).
If you aren't comfortable making these DNS changes, ask your developer or Siftly support before proceeding. A misconfigured O2O setup can briefly affect your live store.
***
## Stage 3: Create a read-only token and copy your Zone ID
Siftly needs two things from Cloudflare: your **Zone ID** (which domain to read) and a **read-only Analytics API token** (permission to read crawler numbers only).
### Copy your Zone ID
In the Cloudflare dashboard, click your domain.
On the **Overview** page, look in the right-hand sidebar under **API**. Copy the **Zone ID**, a 32-character string like `0528d34ebf7f5f8a1c2d3e4f5a6b7c8d`.
### Create the API token
Go to **My Profile → API Tokens → Create Token**, then **Create Custom Token**.
Give it a name, for example `siftly-ai-crawl-readonly`.
Under **Permissions**, add exactly one: **Zone → Analytics → Read**. That's the only permission needed. "Logs Read" is not required.
Under **Zone Resources**, choose **Include → Specific zone → your domain**.
Create the token and copy it now. Cloudflare shows it only once.
**Why this is safe:** the token is read-only and scoped to a single zone's analytics. It can't change your site, DNS, security, or crawler settings, and it can't touch any other domain in your account. Siftly stores it encrypted.
***
## Stage 4: Connect in Siftly
In Siftly, open **Settings → Integrations**.
Find the **Cloudflare** card and click **Connect**.
In the **Connect Cloudflare** dialog, paste:
* **Zone ID** (from Stage 3)
* **API token** (from Stage 3)
* **Zone name** (optional, for example `store.example.com`, used for display only)
Then click **Connect Cloudflare**.
Siftly validates the token with a small test query. If it succeeds, the integration flips to **Connected**, does a first data pull right away, then refreshes hourly. A confirmation message tells you whether your plan supports verified-bot naming or user-agent detection. Both work fine.
***
## What you'll see after connecting
The crawler data lands on your [Traffic](/shopping/analytics/traffic) dashboard:
* **Overview tab.** Crawler Activity trend charts split by AI Citations, AI Indexing, and AI Training, plus a per-bot breakdown. A Platforms table lists every AI system that visited, by category, with change-versus-previous-period arrows.
* **Pages tab.** Top Crawled Pages ranked by crawler requests, with each bar broken down by bot; Pages by Crawler, where you pick a bot and see which pages it hits; and a Platform-to-Page Journey view alongside a Published Articles table that combines crawler, AI-referral, and Search Console data.
* **Logs tab.** A per-request crawler log for the last 24 hours. This tab needs a Cloudflare Enterprise plan. On Free, Pro, and Business plans you'll see the aggregated data on the Overview and Pages tabs instead.
***
## What to expect
| Expectation | Detail |
| -------------------------------- | --------------------------------------------------------------------------------------------------------------------------------------------------------------------------------------------------------- |
| **Not real-time** | Cloudflare's analytics lag by a few minutes, and Siftly refreshes hourly. This is a reporting view, not a live feed. |
| **History starts at connection** | There is no backfill of past crawler activity. Data accumulates from the moment you connect, so connect early. |
| **Hourly aggregates** | On Free, Pro, and Business plans, data is hourly totals per bot and page, not individual request logs. That's normal and enough for trend analysis. |
| **Bot detection** | On the Free plan, crawlers are identified by their user-agent string. Cloudflare's paid Bot Management adds verified-bot confirmation. Both are supported; user-agent detection is the standard baseline. |
| **Per-request logs** | The Logs tab requires a Cloudflare Enterprise plan. Everything else works on Free. |
***
## Troubleshooting
The token is wrong, expired, or lacks **Zone → Analytics → Read**. Re-issue the token (Stage 3) and reconnect.
Your domain probably isn't proxied. Check that the DNS record (or O2O CNAME) shows an orange cloud, and that the domain is **Active** in Cloudflare. Also give real crawlers time to visit.
The Zone ID belongs to a different domain. Copy the Zone ID from the correct domain's Overview page (Stage 3).
Expected on plans without Bot Management. No action needed; detection still works.
Per-request logs need Cloudflare Enterprise. Use the Overview and Pages tabs instead.
Small differences are expected, because Siftly focuses on a curated set of AI and search bots. Large gaps usually mean the domain was only recently proxied, or history is still building.
***
## FAQ
No. The Free plan covers this integration.
Cloudflare acts as a proxy and CDN and typically speeds sites up. The risk to watch is DNS or SSL misconfiguration, so follow the SSL notes above (especially the Shopify O2O warnings) and test your store right after the switch.
No. The token is read-only and scoped to a single zone's analytics.
Go to **Settings → Integrations → Cloudflare** and disconnect. This removes the stored token; data already pulled remains.
***
## Glossary
| Term | Meaning |
| -------------------------- | ------------------------------------------------------------------------------------------------------------------------------------------------- |
| **Zone** | A single domain in Cloudflare (for example `example.com`). |
| **Zone ID** | The 32-character identifier for that domain. |
| **Proxied (orange cloud)** | Traffic for that DNS record routes through Cloudflare, which this integration requires. A grey cloud means DNS-only, and Cloudflare sees nothing. |
| **Orange-to-Orange (O2O)** | Placing your own Cloudflare zone in front of a platform (like Shopify) that already runs its own Cloudflare, using a proxied CNAME. |
| **AI Crawl Control** | Cloudflare's view of AI and search crawler traffic, which this integration reads. |
Questions, or a non-standard hosting setup? Contact Siftly support before changing DNS if you're unsure. A bad DNS or SSL change can briefly affect your live store.
***
## Related
See crawler activity alongside AI referral and organic traffic.
See which sources AI engines cite when recommending products.
Compare every integration and what each one powers.
Connect crawler coverage to shelf presence.
## Overview
Connecting **Cloudflare AI Crawl Control** shows you which AI and search crawlers are visiting your store, which pages they hit, and how often. That covers ChatGPT (`GPTBot`, `ChatGPT-User`), Claude (`ClaudeBot`), Perplexity (`PerplexityBot`), Google (`Googlebot`, `Google-Extended`), and more.
This is the raw signal behind your visibility in AI answers: it tells you whether AI assistants and AI-powered search are actually reading your product and content pages. Once connected, the data appears on your [Traffic](/shopping/analytics/traffic) dashboard.
**Difficulty:** ⚠️ Medium. You route your domain through Cloudflare (a DNS change), then paste a read-only token into Siftly. Cloudflare's Free plan is all you need, at no cost.
This integration is **read-only**. Siftly never changes your site, DNS, or crawler settings. It only reads aggregated crawler numbers, through a token you scope to a single domain's analytics.
Cloudflare groups crawler activity into three types:
| Activity type | What it is | Example bots |
| ------------------------------- | ----------------------------------------------------------- | ---------------------------------------------- |
| **AI Citations** (AI Assistant) | Crawlers that fetch a page to answer a user's question live | `ChatGPT-User`, `Claude-User`, `PerplexityBot` |
| **AI Indexing** (AI Search) | Crawlers building an AI search index | `OAI-SearchBot`, `Claude-SearchBot` |
| **AI Training** | Crawlers collecting data to train models | `GPTBot`, `ClaudeBot`, `CCBot` |
***
## How it works
Cloudflare sits in front of your website as a reverse proxy. Every request to your store, including requests from AI crawlers, passes through Cloudflare's edge, where it is recorded in Cloudflare's analytics. Siftly reads those crawler analytics through a read-only Cloudflare API token that you generate.
Because of this design, your domain has to be served through Cloudflare for there to be anything to read. If you don't have Cloudflare yet, most of this guide is about getting your domain onto Cloudflare first.
The setup has four stages:
1. Create a free Cloudflare account.
2. Get your domain served through Cloudflare. This is the important step, and the method depends on your platform.
3. Create a read-only Analytics token and copy your Zone ID.
4. Paste them into Siftly under **Settings → Integrations → Cloudflare**.
***
## Prerequisites
* Your ecommerce domain (for example `store.example.com` or `example.com`).
* Access to wherever your domain's DNS is managed today, usually your domain registrar (GoDaddy, Namecheap, and similar) or your store platform's domain settings.
* Admin access to your Siftly organization.
* About 30–45 minutes. DNS changes can take a little while to propagate.
***
## Which path is yours?
Getting your domain onto Cloudflare works differently depending on how your store is hosted. Find your situation, then follow the matching path in Stage 2.
| Your setup | Can you change your domain's nameservers? | Path to follow |
| -------------------------------------------------------------------------------- | ----------------------------------------- | ------------------------------------------------------------------------------------------------------- |
| Custom domain on WooCommerce, BigCommerce, a headless store, or your own hosting | Yes, you control DNS at your registrar | **Path A** (standard onboarding) |
| Shopify store on a custom domain (standard Liquid theme) | Partly; Shopify manages some records | **Path B** (Orange-to-Orange) |
| Not sure | | Start with Path A. If your platform won't let you change nameservers, use Path B or ask Siftly support. |
***
## Stage 1: Create a free Cloudflare account
Go to `dash.cloudflare.com/sign-up` and create an account with your work email, then verify the email.
The Free plan covers this integration in full. A paid plan only adds verified-bot naming and, at the Enterprise tier, per-request logs. Both are optional niceties (see [What to expect](#what-to-expect)).
***
## Stage 2: Get your domain served through Cloudflare
### Path A: Standard onboarding (you control your DNS)
Use this if your domain is registered at a normal registrar and you can change its nameservers. This is the common case for WooCommerce, BigCommerce, headless, and self-hosted stores.
In the Cloudflare dashboard, click **Add a site** and enter your domain (for example `example.com`). Choose the **Free** plan when prompted.
Cloudflare scans your existing DNS records and shows them. Confirm that the record pointing at your store (usually an **A** or **CNAME** record for your root and `www`) is set to **Proxied**, shown as an orange cloud rather than grey. The orange cloud routes traffic through Cloudflare; a grey cloud means Cloudflare sees nothing.
Cloudflare gives you two nameservers (for example `xxx.ns.cloudflare.com`). Log in to your registrar and replace your current nameservers with these two.
Wait for Cloudflare to confirm the domain is **Active**, usually minutes to a few hours. You'll get an email. Once the domain shows Active with an orange (proxied) record, crawler traffic starts flowing through Cloudflare and being recorded. Continue to Stage 3.
### Path B: Orange-to-Orange for Shopify (Liquid) stores
Shopify serves your storefront from its own edge, so you can't simply move nameservers the way Path A does. Instead, you place your own Cloudflare zone in front of Shopify with a proxied CNAME. Cloudflare calls this **Orange-to-Orange (O2O)**. Your Cloudflare zone records the crawler traffic before it reaches Shopify.
Add the domain and point its nameservers at Cloudflare, exactly as in Path A.
In Cloudflare **DNS**, create a **proxied** (orange-cloud) **CNAME** for your storefront hostname pointing to `shops.myshopify.com`.
In **SSL/TLS → Overview**, set the encryption mode to **Full**.
Keep your existing domain configured in your Shopify admin so Shopify continues to serve the store and issue its certificate.
**Read these Shopify O2O landmines before you flip DNS:**
* **Do not turn on "Always Use HTTPS" in Cloudflare.** It breaks Shopify's automatic SSL certificate renewal (the Let's Encrypt `/.well-known/acme-challenge/` check), which can take your store's HTTPS down.
* **Checkout is not covered.** Cloudflare does not run on Shopify's `/checkout` path, so crawler activity there won't appear. This is expected and does not affect your product or content pages.
* **Use SSL/TLS = Full**, not "Flexible," so the connection to Shopify stays encrypted.
* **If crawler data is empty after setup**, the most common cause is a CNAME that isn't proxied (grey cloud instead of orange).
If you aren't comfortable making these DNS changes, ask your developer or Siftly support before proceeding. A misconfigured O2O setup can briefly affect your live store.
***
## Stage 3: Create a read-only token and copy your Zone ID
Siftly needs two things from Cloudflare: your **Zone ID** (which domain to read) and a **read-only Analytics API token** (permission to read crawler numbers only).
### Copy your Zone ID
In the Cloudflare dashboard, click your domain.
On the **Overview** page, look in the right-hand sidebar under **API**. Copy the **Zone ID**, a 32-character string like `0528d34ebf7f5f8a1c2d3e4f5a6b7c8d`.
### Create the API token
Go to **My Profile → API Tokens → Create Token**, then **Create Custom Token**.
Give it a name, for example `siftly-ai-crawl-readonly`.
Under **Permissions**, add exactly one: **Zone → Analytics → Read**. That's the only permission needed. "Logs Read" is not required.
Under **Zone Resources**, choose **Include → Specific zone → your domain**.
Create the token and copy it now. Cloudflare shows it only once.
**Why this is safe:** the token is read-only and scoped to a single zone's analytics. It can't change your site, DNS, security, or crawler settings, and it can't touch any other domain in your account. Siftly stores it encrypted.
***
## Stage 4: Connect in Siftly
In Siftly, open **Settings → Integrations**.
Find the **Cloudflare** card and click **Connect**.
In the **Connect Cloudflare** dialog, paste:
* **Zone ID** (from Stage 3)
* **API token** (from Stage 3)
* **Zone name** (optional, for example `store.example.com`, used for display only)
Then click **Connect Cloudflare**.
Siftly validates the token with a small test query. If it succeeds, the integration flips to **Connected**, does a first data pull right away, then refreshes hourly. A confirmation message tells you whether your plan supports verified-bot naming or user-agent detection. Both work fine.
***
## What you'll see after connecting
The crawler data lands on your [Traffic](/shopping/analytics/traffic) dashboard:
* **Overview tab.** Crawler Activity trend charts split by AI Citations, AI Indexing, and AI Training, plus a per-bot breakdown. A Platforms table lists every AI system that visited, by category, with change-versus-previous-period arrows.
* **Pages tab.** Top Crawled Pages ranked by crawler requests, with each bar broken down by bot; Pages by Crawler, where you pick a bot and see which pages it hits; and a Platform-to-Page Journey view alongside a Published Articles table that combines crawler, AI-referral, and Search Console data.
* **Logs tab.** A per-request crawler log for the last 24 hours. This tab needs a Cloudflare Enterprise plan. On Free, Pro, and Business plans you'll see the aggregated data on the Overview and Pages tabs instead.
***
## What to expect
| Expectation | Detail |
| -------------------------------- | --------------------------------------------------------------------------------------------------------------------------------------------------------------------------------------------------------- |
| **Not real-time** | Cloudflare's analytics lag by a few minutes, and Siftly refreshes hourly. This is a reporting view, not a live feed. |
| **History starts at connection** | There is no backfill of past crawler activity. Data accumulates from the moment you connect, so connect early. |
| **Hourly aggregates** | On Free, Pro, and Business plans, data is hourly totals per bot and page, not individual request logs. That's normal and enough for trend analysis. |
| **Bot detection** | On the Free plan, crawlers are identified by their user-agent string. Cloudflare's paid Bot Management adds verified-bot confirmation. Both are supported; user-agent detection is the standard baseline. |
| **Per-request logs** | The Logs tab requires a Cloudflare Enterprise plan. Everything else works on Free. |
***
## Troubleshooting
The token is wrong, expired, or lacks **Zone → Analytics → Read**. Re-issue the token (Stage 3) and reconnect.
Your domain probably isn't proxied. Check that the DNS record (or O2O CNAME) shows an orange cloud, and that the domain is **Active** in Cloudflare. Also give real crawlers time to visit.
The Zone ID belongs to a different domain. Copy the Zone ID from the correct domain's Overview page (Stage 3).
Expected on plans without Bot Management. No action needed; detection still works.
Per-request logs need Cloudflare Enterprise. Use the Overview and Pages tabs instead.
Small differences are expected, because Siftly focuses on a curated set of AI and search bots. Large gaps usually mean the domain was only recently proxied, or history is still building.
***
## FAQ
No. The Free plan covers this integration.
Cloudflare acts as a proxy and CDN and typically speeds sites up. The risk to watch is DNS or SSL misconfiguration, so follow the SSL notes above (especially the Shopify O2O warnings) and test your store right after the switch.
No. The token is read-only and scoped to a single zone's analytics.
Go to **Settings → Integrations → Cloudflare** and disconnect. This removes the stored token; data already pulled remains.
***
## Glossary
| Term | Meaning |
| -------------------------- | ------------------------------------------------------------------------------------------------------------------------------------------------- |
| **Zone** | A single domain in Cloudflare (for example `example.com`). |
| **Zone ID** | The 32-character identifier for that domain. |
| **Proxied (orange cloud)** | Traffic for that DNS record routes through Cloudflare, which this integration requires. A grey cloud means DNS-only, and Cloudflare sees nothing. |
| **Orange-to-Orange (O2O)** | Placing your own Cloudflare zone in front of a platform (like Shopify) that already runs its own Cloudflare, using a proxied CNAME. |
| **AI Crawl Control** | Cloudflare's view of AI and search crawler traffic, which this integration reads. |
Questions, or a non-standard hosting setup? Contact Siftly support before changing DNS if you're unsure. A bad DNS or SSL change can briefly affect your live store.
***
## Related
See crawler activity alongside AI referral and organic traffic.
See which sources AI engines cite when recommending products.
Compare every integration and what each one powers.
Connect crawler coverage to shelf presence.